This is default featured slide 1 title

Go to Blogger edit html and find these sentences.Now replace these sentences with your own descriptions.This theme is Bloggerized by Lasantha Bandara - Premiumbloggertemplates.com.

This is default featured slide 2 title

Go to Blogger edit html and find these sentences.Now replace these sentences with your own descriptions.This theme is Bloggerized by Lasantha Bandara - Premiumbloggertemplates.com.

This is default featured slide 3 title

Go to Blogger edit html and find these sentences.Now replace these sentences with your own descriptions.This theme is Bloggerized by Lasantha Bandara - Premiumbloggertemplates.com.

This is default featured slide 4 title

Go to Blogger edit html and find these sentences.Now replace these sentences with your own descriptions.This theme is Bloggerized by Lasantha Bandara - Premiumbloggertemplates.com.

This is default featured slide 5 title

Go to Blogger edit html and find these sentences.Now replace these sentences with your own descriptions.This theme is Bloggerized by Lasantha Bandara - Premiumbloggertemplates.com.

Showing posts with label ကြန္ပ်ဴတာဆုိင္ရာ နည္းပညာ. Show all posts

Android Application ေရးတဲ့ေဆာ့၀ဲ B4A Full Version


ဒီေဆာ့၀ဲေလးကိုေတာ့
သူငယ္ခ်င္းေတာ္ေတာ္မ်ားမ်ား
ႀကိဳက္ႏွစ္သက္ၾကလိမ့္မယ္လို႔
ထင္ပါတယ္ ..

ဘာေၾကာင့္လဲဆိုေတာ့
ဒီေန႔ေခာတ္မွာ လူသံုးမ်ားလာတဲ့
Android Application ေတြကို
အလြယ္တကူ ဖန္တီးေရးသားႏိုင္တဲ့
ေဆာ့၀ဲေလးျဖစ္ေနလို႔ပါ

ေဆာ့၀ဲရဲ႕ နံမည္ကေတာ့ Basic4Android ပါ
B4A လို႔ လူသိမ်ားပါတယ္ ..


ဒီေဆာ့၀ဲေလးကို သံုးၿပီး Android Application ေတြကို အလြယ္တကူဖန္တီးေရးသားႏိုင္ပါတယ္
ဘယ္လိုေတြ ေရးသားရမယ္ဆိုတာကေတာ့ ကၽြန္ေတာ္ကိုယ္တိုင္လည္း ေလ့လာေနဆဲမို႔
ျပန္လည္မွ်ေ၀ႏိုင္တဲ့ အဆင့္မေရာက္ေသးတာ နားလည္ေပးေစခ်င္ပါတယ္ ..

ကဲ .. ေဆာ့၀ဲေလးကို လိုခ်င္တဲ့ သူငယ္ခ်င္းေတြက ဒီမွာ ေဒါင္းယူႏိုင္ပါတယ္

ေဒါင္းၿပီးရင္ အထဲမွာ ဖိုင္ႏွစ္ဖိုင္ပါပါတယ္ ..
အရင္ဆံုး b4a full.exe ဖိုင္ကို Run ၿပီး Install လုပ္ေပးပါ ..
Install လုပ္ၿပီးတဲ့ ေနာက္ဆံုးအဆင့္မွာ ေအာက္ကပံုအတိုင္း ျဖစ္ေနပါမယ္ ..


Launch Basic4Android ေရွ႕ကအမွန္ျခစ္ေလးကို ျဖဳတ္ၿပီးမွ Finish ကို ႏွိပ္ပါ
Full Version ျဖစ္ေအာင္ Crack ရဦးမွာမို႔ပါ

ၿပီးရင္ Antivirus ေတြကို ခဏပိတ္ထားပါ
b4a gen.exe ဆိုတဲ့ keygen ဖိုင္ေလးကို C >> Program files >> Anywhere Software >> Basic4Android ဆိုတဲ့ ဖိုဒါထဲကို အဆင့္ဆင့္ ဖြင့္၀င္ၿပီး ကူးထည့္ေပးလိုက္ပါ
ၿပီးရင္ ကူးထည့္လိုက္တဲ့ b4a gen.exe ဖိုင္ကို Run လိုက္ပါ
ေအာက္ကပံုအတိုင္း ပြင့္လာပါမယ္ ..


email ထည့္ရမယ့္ အကြက္ထဲမွာ ထည့္ခ်င္တဲ့ email ကို ထည့္ေပးလိုက္ပါ ( တကယ္ရွိစရာမလိုပါဘူး)
ၿပီးရင္ Generate license file ကို ႏွိပ္ေပးလိုက္ရင္ ေအာက္ကပံုအတိုင္း ပြင့္လာပါမယ္ ..


OK ကို ႏွိပ္ေပးလိုက္ပါ ..

ၿပီးရင္ Desktop ေပၚက Basic4Android program ကို ဖြင့္လိုက္ပါ ..
တခ်ိဳ႕စက္ေတြမွာ email ထည့္ရမယ့္ Box ေလးတက္လာပါမယ္ .. keygen တုန္းကထည့္ခဲ့တဲ့ email ကိုပဲ ျပန္ထည့္ေပးလိုက္ရင္ Full Version ျဖစ္သြားပါၿပီ
တခ်ိဳ႕စက္ေတြေတာ့ ဘာ Box မွ တက္မလာပဲ Full Version ျဖစ္သြားပါတယ္ ..
Help ဆိုတဲ့ထဲက About ကိုႏွိပ္ၾကည့္လိုက္ရင္ Registered Version ဆိုတာကို ေတြ႕ရပါလိမ့္မယ္ ..

အဲ .. တစ္ခု ျဖည္စြက္ၿပီး ေျပာခ်င္တာက B4A ကို သံုးၿပီး Android Application ေတြ ဖန္တီးေရးသားမယ္ဆိုရင္ SDK ဆိုတာေလးလည္း
စက္ထဲမွာ Install လုပ္ထားမွ အဆင္ေျပပါတယ္ ..
အဲဒီ SDK ကို Install မလုပ္ရေသးဘူးဆိုရင္ေတာ့ ဒီေနရာ ကို သြားလိုက္ပါ
ေအာက္ကပံုအတိုင္း ပြင့္လာပါမယ္
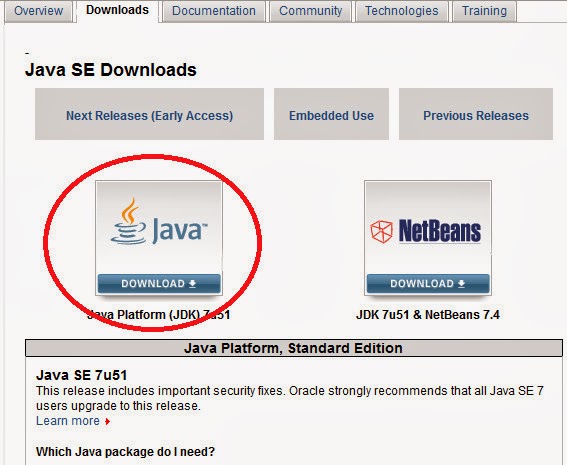


 Java Download ဆိုတဲ့ေနရာကို ႏွိပ္ပါ
ေအာက္ကပံုအတိုင္း ပြင့္လာပါမယ္


Accept Locense Agreement ေရွ႕မွာ အမွတ္ကေလး ထည့္ေပးၿပီး ေအာက္မွာ ကိုယ့္၀င္းဒီးအမ်ိဳးအစားကို လိုက္ၿပီး ေဒါင္းယူ Install လုပ္ရမွာျဖစ္ပါတယ္


ကဲ ... အဆင္ေျပၾကပါေစဗ်ာ

နည္းပညာလမ္းေၾကာင္းေပၚက သူငယ္ခ်င္းအားလံုးကို ေလးစားခင္မင္လွ်က္

Computer Viberမွာ ျမန္မာစာ ျမင္ရ ေရးရေအာင္လုပ္နည္းႏွင့္ Computer အတြက္ Viber ေဆာ့၀ဲ


ကြန္ပ်ဳတာမွာ Viber မထည့္ရေသးရင္ယူထည့္ပါ ဒီဟာကို သံုးမယ္ဆိုရင္ ထည့္
ဒီဟာသံုးမယ္ဆို ဖုန္းမွာလည္း Viber ရွိမွ သံုးလို ့ရပါတယ္ ျမန္မာစာျမင္ဖို ့ဆိုရင္
ေဒါင္းလုပ္ယူထားတဲ့ေဖာင့္ကို ႏွစ္ခ်က္ႏွိပ္ အင္စေတာလုပ္ ပီးရင္ Restart ခ်ပါ
ဘာမွ ထပ္ျပင္စရာမလိုပါဘူး မသံုးရေသးသူမ်ား ေအာက္ကလင့္မွာယူျပီးသံုးပါ
ဒီေဖာင့္ထည့္ပီးမွ ေမာ္ဇီလာမွာ မျမင္ရေတာ့ရင္ ျပန္လုပ္မယ့္နည္း လြယ္ပါတယ္
ေမာ္ဇီလာက Tools / Option / Content / Advanced ကိုဆက္သြားလိုက္ပါ
အဲ႕ဒီမွာ Allow Pages to choose အဲ႔မွာ ခ်စ္ထားတဲ
အမွန္ခ်စ္ေတြကိုျဖဳတ္ok
မသံုးရေသးသူ ေအာက္ကလင့္မွာ Viber ေဆာ့၀ဲေရာ ျမန္မာေဖာင့္ေရာေဒါင္း

Download - Viber PC Version & Myanmar Font

Hash Kracker v1.0 All-in-one Hash Passwaord Recovery Tool


Hash Kracker v1.0 All-in-one Hash Passwaord Recovery Tool

soeko
သူကေတာ့ ..Password Recover Tools ေလးတခုပါဘဲ Hackin Tools ေလးတခုလုိ ့
လည္းေျပာလုိ ့ရပါတယ္…သူမ်ားကိုဒုကၡေပးဖုိ ့အတြက္တင္လုိက္တာေတာ့မဟုတ္ပါဘူး….
ပညာတခုအတြက္စမ္းသပ္ခ်င္တဲ့သူေတြအတြက္ ပညာရရန္သီးသန္ ့တင္ေပးလုိက္ျခင္းသာျဖစ္ပါ
တယ္..က်ေနာ္ ကုိယ္တုိင္လည္းသူမ်ားကုိလုိက္ဒုကၡမေပးတတ္ပါဘူး က်ေနာ္စမ္းရင္လည္းဘဲ
က်ေနာ့္ ကိုယ္ပုိင္ အေကာင့္ေတြကိုစမ္းသပ္တာဘဲမ်ားပါတယ္…ကဲကဲ….အားလုံးဘဲစမ္းသပ္
ခ်င္ရင္ေအာက္မွာဆက္ၾကည့္လုိက္ပါဦး။
Hash Kracker is our new all-in-one tool to recover the hash password
for multiple hash types. Current version supports following popular
hash types such as MD5, SHA1, SHA256, SHA384, SHA512.
-Features of Hash Kracker
-Free tool to recover the hash password
-Supports popular hash types such as MD5, SHA1, SHA256, SHA384, SHA512.
-Automatically detects the Hash Type
-Displays detailed statistics during Cracking operation
-Stop the password cracking operation any time.
-Easier and Quicker to use with cool interface.
-Generate Hash Password Recovery report in HTML/XML/TEXT format.
-Fully Portable tool, can run from anywhere.
-Includes Installer for local Installation & Uninstallation.
၂
လုပ္နည္းေလးေတြကိုၾကည့္ခ်င္ရင္ေတာ့

ဒီေနရာေလးကုိကလစ္လုိက္ပါ။
Download HashKracker

phone အလြယ္တကူ..ေငြမေပးဘဲေခၚရေအာင္

phone အလြယ္တကူ..ေငြမေပးဘဲေခၚရေအာင္


ကၽႊန္ေတာ့္ကုိသူငယ္ခ်င္းတစ္ေယာက္ကေ၀မွ်ေပးလိုက္တာပါ။။ ယခုလို pfingo ,skype တို႔လို႔၀ယ္စရာမလိုေတာ့ဘူး။ ေငြအကုန္သက္သာတဲ့အၿပင္.... အဲဒီေဆာ့၀္လ္ကဆိုဒ္ေတာ္ေတာ္မ်ားမ်ားမွာေတြ႔တယ္လို႔ေၿပာတယ္။ အဲဒီေဆာ့၀္လ္ကိုဖြင့္တာနဲ႔ ကိုယ့္ရဲ႔ဖုန္းနံပါတ္ၿပတယ္။ ကိုယ္ေခၚခ်င္တဲ့လူရဲ႔ဖုန္းနံပါတ္ထည့္...ဘယ္ကၿဖစ္ၿဖစ္ရတယ္...ဟန္းဖုန္း...တယ္လီဖုန္းတို႔ရတယ္။ တကယ္လည္းစမ္းၾကည့္ပါ။ အက်ိဳးတကယ္ရွိတဲ့အၿပင္ ဖုန္းအစစ္လို Contacts ပါတယ္။ သူငယ္ခ်င္းအသစ္ရွာ...ဘာမွမၿဖစ္ဘူး။ အသံ၊ ကြန္ပ်ဴတာနဲ႔ခ်က္တာ..video(vzochat လို)ပါတယ္။ register လုပ္စရာမလို..spyware..virus လံုး၀မရွိေစရဘူး။ ေဆာ့၀္လ္ကအလကားေပးတာ(သားကအလကားမွယူခ်င္တာ..ဟီး)။ဘယ္သူပဲၿဖစ္ၿဖစ္..လ်ိဳ႔၀ွက္ဖုန္းနံပါတ္ကိုရရွိႏိုင္တယ္။

ေဆာ့၀္လ္နာမည္က CQPhone ပါ။ ဖိုင္ဆိုဒ္ကေပါ့ေပါ့ပါးပါးပါ။ 2.62 MB ရွိပါတယ္။ သူ႔ရဲ႔မူရင္းဆိုဒ္က http://www.cqphone.com/ ပါ။ အခု version က 2.4 ပဲရွိပါေသးတယ္(ေလာေလာဆယ္ကိုေၿပာတာ)။ မူရင္းေဒါင္းလုတ္လင့္က http://www.cqphone.com/cqsetup2404.exe မွာပါ။

ဒီ ပို႕ ေလးက စိမ္႕စမ္းေရ စီကပါ ကြ်န္ေတာ္ မအားလို႕ ကိုယ္ပိုင္ပို႕မတင္ႏိုင္တာခြင္႕လႊတ္ပါဗ်ာ၊ဒါေပမယ္႕ ကြ်န္ေတာ္တို႕ ဘေလာ႕ကာညီအစ္ကိုေမာင္ႏွမေတြရဲ႕ ပို႕ေတြက ခင္ဗ်ားတို႕ကို ဗပာုသုတရေစမွာေသခ်ာပါတယ္၊

WiFi ဟက္ဖို႔ အလြယ္ဆံုးနည္း (ပံုႏွင့္တကြ တစ္ဆင့္စီ ရွင္းျပေပးလိုက္ပါတယ္)


Easy Way to Hack WEP/WPA/WPA2 Wi-Fi Password,wifi hacking,Easy Way to Hack WEP/WPA/WPA2 Wi-Fi Password.pdf,Easy Way to Hack WEP/WPA/WPA2 Wi-Fi Password pdf book,how to Hack WEP/WPA/WPA2 Wi-Fi Password

ကၽြန္ေတာ္ အစကေတာ့ ဒီပိုစ့္ ဆက္မေရးေတာ့ဘူးဆိုျပီး ပစ္ထားလိုက္တာ ဒီေန႔ ပ်င္းေနတာနဲ႔ ျပန္ဆက္ေရးျဖစ္ပါတယ္ ကၽြန္ေတာ္တို႔ WiFI hack လုပ္တာကို နည္းလမ္းမ်ားစြာ ေလ့လာၾကရဖူးမွာပါ ကၽြန္ေတာ္တင္ေပးထားတာကိုပဲ ေလးငါးခုေလာက္ရွိေနျပီ အခု ဒီနည္းကေတာ့ လက္ရွိ အသံုးျပဳေနဆဲ အလြယ္ကူဆံုးနည္းလမ္းေလးလို႔ ေျပာရပါမယ္ ကၽြန္ေတာ္ စာဖတ္သူအဆင့္အတန္းမ်ားကို မူၾကိဳ အဆင့္ကေန စနားလည္ေအာင္လို႕ ေအာက္မွာ ပံုႏွင့္တကြ တစ္ဆင့္စီ ရွင္းျပေပးထားပါတယ္ ပညာရွင္ေတြကေတာ့ ၾကည့္တာနဲ႔ သိမွာပါ

ပထမဆံုး စာဖတ္သူမွာ ရွိထားရမယ့္ဟာေလးေတြ အရင္ေျပာေပးပါမယ္


1. USB pen drive တစ္ေခ်ာင္း
2. beini.iso file ေအာက္မွာ ေဒါင္းလင့္ထည့္ထားေပးပါတယ္

3.  USB drive bootable လုပ္ႏိုင္ဖို႔  UNetbootin software လိုပါတယ္  [Download for WindowsLinux or Mac]
  ကဲ အခု ( WEP) ကို လုပ္နည္း ေပါ့ ဗ်ာ ပံုစံေျပာတာပဲေနာ္
1.USB UNetbootin နဲ႔  beini.iso  ဖန္တီးထားပါမယ္ ေအာက္ကပံုကိုၾကည့္ပါ လုပ္တတ္မယ္လို႔ ယူဆပါတယ္

Easy Way to Hack WEP/WPA/WPA2 Wi-Fi Password,wifi hacking,Easy Way to Hack WEP/WPA/WPA2 Wi-Fi Password.pdf,Easy Way to Hack WEP/WPA/WPA2 Wi-Fi Password pdf book,how to Hack WEP/WPA/WPA2 Wi-Fi Password
2. ေနာက္ စက္ကို Restart ေပးျပီး USB ကေန Boot တက္ေပးပါ

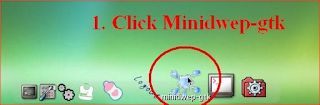
3. BOOT တက္တာ ေအာင္ျမင္ရင္ေအာက္ကပံုလို ျမသ္ရပါမယ္ အဲဒီမွာ ပံုျပထားတဲ့အတိုင္း Minidwep-gtk ကိုႏွိပ္ပါမယ္

WiFi Hacking2
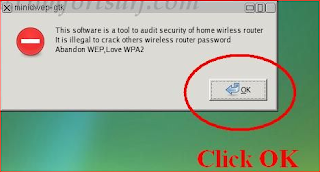
4. ေနာက္ OK.
Easy Way to Hack WEP/WPA/WPA2 Wi-Fi Password,wifi hacking,Easy Way to Hack WEP/WPA/WPA2 Wi-Fi Password.pdf,Easy Way to Hack WEP/WPA/WPA2 Wi-Fi Password pdf book,how to Hack WEP/WPA/WPA2 Wi-Fi Password
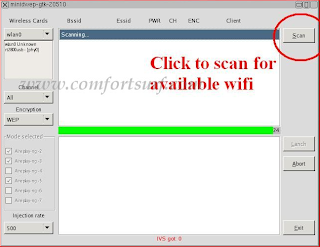
5. ေအာက္မွာ Minipwep-gtk  program ပြင့္ေနတဲ့ပံုပါ အဲဒီမွာ Scan ကိုႏွိပ္ပါ ၀ိုင္းျပထားပါတယ္
Easy Way to Hack WEP/WPA/WPA2 Wi-Fi Password,wifi hacking,Easy Way to Hack WEP/WPA/WPA2 Wi-Fi Password.pdf,Easy Way to Hack WEP/WPA/WPA2 Wi-Fi Password pdf book,how to Hack WEP/WPA/WPA2 Wi-Fi Password
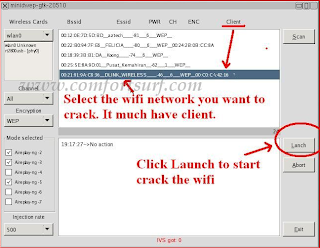
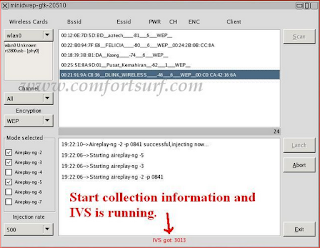
6. wireless network တစ္ခုကိုေရြးခ်ယ္ေပးရပါမယ္ ဒီအတြက္ Client ကိုေရြးျပီး ေပၚလာတဲ့ listေတြထဲကတစ္ခုကိုေရြးေပးလိုက္ပါ  ေနာက္ creaking process စတင္ႏိုင္ရန္Lunch ကိုႏွိပ္ေပးပါ
Easy Way to Hack WEP/WPA/WPA2 Wi-Fi Password,wifi hacking,Easy Way to Hack WEP/WPA/WPA2 Wi-Fi Password.pdf,Easy Way to Hack WEP/WPA/WPA2 Wi-Fi Password pdf book,how to Hack WEP/WPA/WPA2 Wi-Fi Password
7. သင့္ victim connections ေတြရဲ႕ IVS value နဲ႔ password strength ေတြကို ရွာေဖြေနပါမယ္
Easy Way to Hack WEP/WPA/WPA2 Wi-Fi Password,wifi hacking,Easy Way to Hack WEP/WPA/WPA2 Wi-Fi Password.pdf,Easy Way to Hack WEP/WPA/WPA2 Wi-Fi Password pdf book,how to Hack WEP/WPA/WPA2 Wi-Fi Password
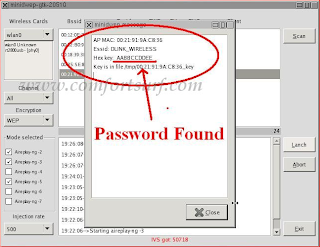
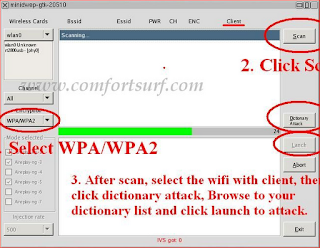
8. password ကို ရွာေတြ႕ပါျပီ ဒီသင္ခန္းစာက ဒီမွာ ျပီးပါျပီ ေအာက္မွာ အဆက္ျပီးWPA/WPA2 အတြက္ သေဘာေလာက္ျပလိုက္ပါတယ္
Easy Way to Hack WEP/WPA/WPA2 Wi-Fi Password,wifi hacking,Easy Way to Hack WEP/WPA/WPA2 Wi-Fi Password.pdf,Easy Way to Hack WEP/WPA/WPA2 Wi-Fi Password pdf book,how to Hack WEP/WPA/WPA2 Wi-Fi Password

ဒီေအာက္ကပံုမွာ ေလ့လာပါ

Easy Way to Hack WEP/WPA/WPA2 Wi-Fi Password,wifi hacking,Easy Way to Hack WEP/WPA/WPA2 Wi-Fi Password.pdf,Easy Way to Hack WEP/WPA/WPA2 Wi-Fi Password pdf book,how to Hack WEP/WPA/WPA2 Wi-Fi Password
ခိုးႏိုင္ၾကလို႔ သီလပ်က္ၾကပါေစဗ်ာ...


Download Link : Mediafire

Internet Speed ကို ဆြဲယူသံုးစြဲမယ့္ Internet Speed Hack v6.1 (300KB)


Internet Speed Hack v6.1 ဟာ ကိုယ္နဲ႔ Network Group တစ္ခုအတြင္းမွာရွိတဲ့ Connection Speed ကို ဆြဲယူသံုးစြဲဖို႔ ေဆာင္ရြက္ေပးပါတယ္.. Wifi Group ဆို ပိုေကာင္းတာေပါ့ဗ်ာ.. ဒီေကာင္နဲ႔သံုးလိုက္တာနဲ႔ အျခားလူေတြ Speed က်သြားၿပီး ကိုယ္တစ္ေယာက္တည္း အတြက္ပဲ တက္လာမွာျဖစ္ပါတယ္.. ကြန္ပ်ဴတာမွာ .Net Framework 4.0 ႏွင့္အထက္ လိုအပ္မွာျဖစ္ပါတယ္..
အသံုးျပဳတာကေတာ့ ဒီေကာင္ကို Run လိုက္ပါ..
ၿပီးရင္ ေပၚလာတဲ့ေဘာက္ထဲက Internet Speed ေခါင္းစဥ္ေအာက္မွာ အျမင့္ဆံုး speed ကိုေရြးလုိက္ၿပီး Patch ကိုႏွိပ္လိုက္ပါ.. ဒါဆို Loading လုပ္ေနတဲ့ေဘာက္တက္လာမွာျဖစ္ပါတယ္.. ခဏေစာင့္ၿပီး OK ေပးလိုက္ပါ.. ပြင့္ေနတဲ့ ေဘာက္ကို မပိတ္ရဘူးေႏွာ္.. ပိတ္လိုက္ရင္ ရပ္သြားမွာျဖစ္ပါတယ္.
အသံုးျပဳမယ္ဆို ေအာက္ကလိပ္စာမွာရယူနုိင္ပါတယ္ 
Download>>>> mirrorupload (or)zippyshare (or)sendspace (or)mediafire
ကုိေမာင္ေပါက္ဆိုဒ္မွ ျပန္လည္ကူးယူေဖာ္ျပသည္

Software မသံုးပဲ Internet Speed ေလးျမွင့္ၿပီး သံုးၾကည့္ရေအာင္


အခု ကၽြန္ေတာ္ ေရးေပးမဲ့ နည္းလမ္းေလးကေတာ့ အင္တာနက္ အသံုးျပဳတဲ့ အခါမွာ မိမိတို႔ကြန္ပ်ဴတာက အသံုးျပဳသူ ( Client Computer ) အျဖစ္ အသံုးျပဳတဲ့ သူမ်ားအတြက္ အင္တာနက္ Speed ကုိတိုးျပီး အသံုးျပဳလို႔ ရမယ့္ နည္းလမ္းေလးပါ .. ကၽြန္ေတာ္လည္း အားလံုးအတြက္ အဆင္ေျပမယ္ ထင္လို႔ ျပန္ေရး ေပးတာ ျဖစ္ပါတယ္ .. ဒီေနရာမွာ တစ္ခါထဲ ေျပာျပပါရေစ .. ေမးခြန္းေမးရင္လည္း ေျဖလို႔ ရမဲ့ ေမးခြန္းမ်ိဳးကို ေမးတာ ပိုအဆင္ေျပမယ္ ထင္ပါတယ္ .. ျမန္မာႏိုင္ငံမွာ ေပးေနတဲ့ အင္တာနက္လိုင္းေတြ တစ္ခ်ိဳ႕လိုင္းေတြ ပ်က္ေနတယ္ .. လိုင္းေတြက မမွန္ပဲ တက္လိုက္က်လိုက္ေတြ ျဖစ္ေနတာေတြက ကၽြန္ေတာ္လည္း ဘာမွ လုပ္ေပးလို႔ မရပါဘူး .. အဲ့ဒါမ်ိဳးကို ဘယ္လိုလုပ္ရမလည္း ေမးရင္ေတာ့ ကၽြန္ေတာ္လည္း ျပန္ေျဖေပးဖို႔ ခက္ပါလိမ့္မယ္ .. ေလာေလာဆယ္ အဆင္ေျပႏိုင္မဲ့ နည္းလမ္းေလးကိုေတာ့ ကၽြန္ေတာ္ ေအာက္မွာ ပံုေလးေတြနဲ႔ အဆင့္ဆင့္ ရွင္းျပေပးထားပါတယ္ ..

အရင္ဆံုး Keyboard မွ  Ctrl + R ကိုႏွိပ္ျပီး  Run Box ကိုဖြင့္လိုက္ပါ .. ျပီးရင္ Run Box ထဲမွာ gpedit.msc လို႔ရိုက္ထည့္ျပီး Enter ေခါက္လိုက္ပါ .. ဒါဆိုရင္ Local Group Policy Ediitor Box ေပၚလာပါလိမ့္မယ္ .

ေအာက္ကပံုအတိုင္း ေပၚလာျပီ ဆိုရင္ေတာ့ ပံုမွာ ျပထားတဲ့ အတိုင္း  Administrative Templates  >> Network >>  QoS Packet Scheduler  ဆိုျပီး အဆင့္ဆင့္ သြားျပီး QoS Packet Scheduler  ကိုေရာက္ျပီ ဆိုရင္ ညာဘက္က Limit reservable bandwidth ကိုရွာပါ .. ေတြ႕ျပီဆိုရင္ အဲ့ဒီေကာင္ေလးကို Double Ckick ေပးလိုက္ပါ .. 
ေအာက္ကပံုအတိုင္း Limit reservable bandwidth Box ေလးေပၚလာပါလိမ့္မယ္ .. အဲ့ဒီက်ရင္ ပံုမွာ ျပထားတဲ့ အတိုင္း Not Configured ကို Enable ေပးလိုက္ပါ .. ျပီးရင္ Bandwidth limit ( % ) ကို 20 မွ 80 ေျပာင္းေပးလိုက္ပါ .. ျပီးရင္ေတာ့ Apply >> OK ေပးလိုက္ယံုပါပဲ ..
ဒါကေတာ့  Client Computer ေတြမွာ Internet Speed ကို လက္ရွိ Bandwidth Limit ထက္ပိုျပီး ျမွင့္ျပီး သံုးႏိုင္မဲ့ နည္းလမ္းေလးပဲ ျဖစ္ပါတယ္ .. သံုးၾကည့္ခ်င္တဲ့ သူေတြကေတာ့ စမ္းၾကည့္လိုက္ေပါ့ဗ်ာ ..
အားလံုးပဲအဆင္ေျပၾကပါေစ .. ေက်းဇူးတင္ပါတယ္ခင္ဗ်ာ ..

android ထဲက game ေတြကို pc ေပၚမွာ ကစားမယ္


အမ်ိဳးေကာင္းသား ဆိုက္မွျပန္လည္ေဖာ္ျပသည္

Android appနဲ႔ game ကုိ Pc ေပၚမွာ သံုးခ်င္တဲ့ သူေတြအတြက္YouWave for Android 2.3.3

ဒါေတာကိုေတာ့ေတာ္ေတာ္မ်ားမ်ားရင္းနွီးသားပါ
အသံုးတဲ့သူငယ္ခ်င္းေတြ အဆင္ေျပေအာင္လို႔ Patch ဖိုင္သက္သက္ခြဲတင္ေပးထားပါတယ္ 
Download>>>minus
Patch Download>>>minus (or)box
မႈရင္းဆိုဒ္ကေနေဒါင္းခ်င္သူေတြအတြက္ http://youwave.com/ မွာေဒါင္းျပီးေတာ့ 
Patch ဖုိင္ကုိအသံုးျပဳနုိင္ပါတယ္ အဆင္ေျပပါေစ

အျပင္က Android Applicaton & Games ကုိေရာ ဘယ္လုိသုံးမွာလည္း
အဲဒါေတာ့ကိုေတာ္ေတာ္မ်ားမ်ားသံုးတတ္မယ္ထင္ပါတယ္ မတတ္တဲ့သူေတြကြ်န္ေတာ္ရွင္းျပေပးပါမယ္
ကြ်န္ေတာ္ စက္ထဲက Android Applicaton အဲဒါကို ကလစ္နွစ္ခ်က္နုိပ္ျပီးေတာ့ Install လုပ္ယံုပါဘဲ
Android Applicaton နံေဘးေဘာက္ထဲကိုေရာက္ေအာင္ဘယ္လိုလုပ္ရမလညး္ဆိုရင္
ပံုထဲကအတုိင္း File>>>Patch to apps ထဲကုိ၀င္လိုက္ပါ
ပံုထဲကအတုိင္းေတြ႔ရမယ္ခင္ဗ်ာ Android Applicaton ထားတဲ့ ဖုိင္ကုိ ပံုမွျပထားအတိုင္း ေရႊးျပီး Open ကုိကလစ္လုိက္ပါ
(ကြ်န္ေတာ္က မန္မုိကတ္ကုိေရႊးထားပါတယ္) ကလစ္လိုက္ရင္ အေပၚဆံုးက ပံုအတုိင္း Android Applicaton ေတြကို ျမင္ရမွာျဖစ္ပါတယ္
အဲဒါဆိုရင္ ကုိယ္နွစ္သက္တဲ့ Android Applicaton ထည့္သြင္းျပီးေတာ့ အသံုျပဳနုိင္ပါျပီ
အဲဒါဆိုရင္ နားလည္ေလာက္ပီထင္ပါတယ္ youwave ရဲ့ အားနည္းခ်က္ေတာ့ Game ေတြထည့္ျပီးကစားရတာအဆင္မေျပပါဘူး
http://bluestacks.com/ ကေတာ့ Game ေတြ ကစားရတာ အဆင္ေျပပါတယ္ စိတ္၀င္စားရင္ ေလ့လာနုိင္ပါတယ္
Applicaton ေတြဘဲ ထည့္ျပီးေတာ့ အသံုးျပဳရတာအဆင္ေျပပါတယ္ ေအာက္မွာ နမႈနာပံုေတြကုိၾကည့္နုိင္ပါတယ္
Applicaton ကုိ Install လုပ္ျပီးေတာ့ အင္တာနက္အသံုးျပဳထားတဲ့ ပံုေတြပါ

Android Applicaton & Games ေတြကို ဒီမွာ မွာရယူနုိင္ပါတယ္ ပိုက္ဆံနဲ႔၀ယ္တဲ့ ဟာေတြကုိအမ်ားဆံုးတင္ေပးထားပါတယ္

Mozilla Firefox ႏွင့္ IE Internet Explore တြင္ ျမန္မာစာ ရွင္းရွင္းလင္းလင္း ျမင္ရေစရန္...


ေမာ္ဇီလာတြင္ ျမန္မာလုိ မေပၚပါက Tool > Options > Content > Default font ေနရာတြင္ ေဇာ္ဂ်ီဝမ္း ကုိေျပာင္းေပးပါ။ အကယ္၍ မေပၚလာေသးဘူးဆုိလွ်င္... Advance ကုိႏွိပ္ျပီး Zawgyi One ကုိ ေရြးေပးပါ။ ထုိေနာက္ Default Character Encoding တြင္ Unicode (UTF-8) ကုိေရြးပါ။
         
 Internet Explore တြင္ ျမန္မာလုိ မေပၚပါက... ေအာက္ပါ ကုဒ္ကေလးမ်ားကုိ ေကာ္ပီကူးယူလုိက္ပါ။ ထုိ႕ေနာက္ Notepad ျဖင့္ သိမ္းပါ။ System C တြင္ သိမ္းပါ။ အခ်ဳိ႕ေသာ ကြန္ျပဴတာမ်ားတြင္ စီထဲတြင္ သိမ္းမရပါက Desktop ေ႔ပၚတြင္ သိမ္းပါ။ ထုိသုိ႕ သိမ္းရာတြင္ ie.bat ဟုအမည္ေပးျပီး သိမ္းပါ။

body
{
font-family:Zawgyi-one;
}


input, select , textarea
{
font-family:Zawgyi-one;
}

ထုိ႕ေနာက္ Internet Explore ကုိဖြင့္ျပီး Tools > Internet Option > Fonts တြင္ ေဇာ္ဂ်ီဝမ္းကုိ ေရြးပါ။ သုိ႕ေသာ္ ရွင္းသြားျပီလုိ႕ အာမ မခံနဳိင္ေသးပါ။ Accessibility ကုိႏွိပ္ပါ။ အလယ္ေခါင္တြင္ ရွိေသာ Ignore font styles specified on webpages ႏွင့္ User style sheet ေအာက္က ေလးေထာင့္ကြက္ကုိလည္း မွတ္ကင္ ေပးပါ။ ထုိေနာက္ Browse မွ အထက္က Notepad ျဖင့္ ေရးထားေသာ ဖုိင္ကုိ သြားဖြင့္ေပးလုိက္ပါ။ ၁၀၀% ယုံႀကည္လုိက္ပါ။ ျမင္ရပါျပီ။ ^^ အထက္က နဳတ္ပက္ ဖုိင္ကုိ ဖ်က္မပစ္မခ်င္း^^အဆင္ေျပၾကပါေစဗ်ာ......ေမးထဲမွာရွင္းရင္းနဲ့ေတြ့ျပန္ေတာ့တင္မိျပန္ပါတယ္
ခင္မင္ေလးစားလ်က္ေနလင္းျဖိဳး

ျမ၀တီရုပ္ျမင္သံၾကား Channel အား ကြန္ပ်ဴတာမွၾကည့္ရႈနည္း


ကြန္ပ်ဴတာကေန ျမ၀တီရုပ္ျမင္သံၾကား Channel ကုိၾကည့္ရႈနုိင္မယ့္ နည္းျဖစ္ပါတယ္။ အင္တာနက္ကြန္နက္ရွင္ရွိဖုိ႕ပဲလုိပါတယ္။ တစ္ကမၻာလုံးကေန ၾကည့္ရႈနုိင္မွာျဖစ္ပါတယ္။ လုပ္နည္းကုိေအာက္မွာဆက္လက္ဖတ္ရႈပါ။

အရင္ဆုံးလုိအပ္တဲ့ ေဆာ့၀ဲျဖစ္တဲ့ VLC Player ကုိေအာက္က link မွာရယူလုိက္ပါ။

www.videolan.org/vlc/download-windows.html

Download လုပ္ျပီးလွ်င္ VLC Player အားကြန္ပ်ဴတာမွာ install လုပ္ထားပါ။


ျမဝတီ Live ၾကည့္ရႈ႕ရန္အတြက္ VLC Player တြင္ ေအာက္ပါအတိုင္း ျပင္ဆင္ၿပီး ၾကည့္ရႈ႕ႏိုင္မည္ျဖစ္သည္။
အဆင့္(၁)
VLC Player ၏ Menu Bar မွ Tools > Preferences အတြင္းသို႕ ဝင္ေရာက္ပါ။

Prefence Windows ေပၚလာေသာအခါ ဘယ္ဘက္ Pannel အတြင္းတြင္ ရွိ အနီျဖင့္ ျပထားေသာ Input & Codes ကို ကလစ္ျပဳလုပ္ကာ ညာဘက္ Pannel အတြင္းရွိ အနီျဖင့္ျပထားေသာ HTTP Proxy URL ေနရာတြင္ ဖုန္းလိုင္းျဖင့္ အသံုးျပဳျခင္းေၾကာင့္ ဖုန္းလိုင္း Internet သည္ no prxy ျဖစ္သည္။ ထို႕ေၾကာင့္ ယခင္ရွိေနေသာ Proxy လိပ္စာကို ဖ်က္ပစ္ရမည္ ျဖစ္သည္။

ထိုသို႕ ဖ်က္ၿပီးပါက Save ျပဳလုပ္ေပးရမည္ ျဖစ္ပါသည္။
အဆင့္ (၂)
ေအာက္တြင္ ျပထားသည့္အတိုင္း VLC Player Menu Bar မွ Media Menu ကို ကလစ္ျပဳလုပ္ကာ ေပၚလာေသာ Drop Drown Menu မွ Open Network Stream ကို ကလစ္ျပဳပါ။

အဆင့္ (၃)
ေပၚလာေသာ Open Media Windows မွ Please enter a network URL: ေနရာတြင္ ပံုတြင္ျပထားသည့္အတိုင္း http://www.myawaddy.net.mm/mwdlive ကို ထည့္သြင္းကာ Play ျပဳလုပ္ပါ။

ထို႕ေနာက္ ျမဝတီ တိုက္ရိုက္ (MWD Live) ကို ၾကည့္ရႈ႕ ႏိုင္မည္ျဖစ္ပါသည္။

Window Xp တင္နည္း


ဒါကေတာ့ Window Xp တင္နည္းျမန္မာလို စာအုပ္ေလးပါ...။

ဒီမွာ  ယူလုိက္ပါ

အားလုံအဆင္ေျပၾကပါေစ

Windows Run Commands မ်ား စုစည္းေဖာ္ၿပၿခင္း


မဂၤလာပါဗ်ာ ကြန္ပ်ဴတာ အသုံးၿပဳသူ User တစ္ေယာက္ အေနနဲ႔အသုံးၿပဳၿခင္း လ်င္ၿမန္ေစရန္ Run Commands မ်ားကုိမ်ားစြာ သိထားဖုိ႔ လုိအပ္ပါတယ္ဗ်ာ တစ္ခုခုဆုိမိမိသြားခ်င္တဲ႔ ေနရာကုိ လြယ္ကူစြာ သြားႏုိင္မယ္ ၿဖစ္ပါတယ္Run Commands မ်ားကုိ မူရင္း အတုိင္း ၿပန္လည္ ေဝမွ်ခဲ႔ပါတယ္ခင္ဗ်ာ


  • Accessibility Options : access.cpl

  • Add Hardware: hdwwiz.cpl

  • Add / Remove Programs: appwiz.cpl

  • Administrative Tools : control admintools

  • Automatic Updates: wuaucpl.cpl

  • Wizard file transfer Bluethooth: fsquirt

  • Calculator: calc

  • Certificate Manager: certmgr.msc

  • Character: charmap

  • Checking disk : chkdsk

  • Manager of the album (clipboard) : clipbrd

  • Command Prompt : cmd

  • Service components (DCOM) : dcomcnfg

  • Computer Management : compmgmt.msc

  • DDE active sharing : ddeshare

  • Device Manager : devmgmt.msc

  • DirectX Control Panel (if installed) : directx.cpl

  • DirectX Diagnostic Utility : dxdiag

  • Disk Cleanup : cleanmgr

  • System Information=dxdiag

  • Disk Defragmenter : dfrg.msc

  • Disk Management : diskmgmt.msc

  • Partition manager : diskpart

  • Display Properties : control desktop

  • Properties of the display (2) : desk.cpl

  • Properties display (tab "appearance") : control color

  • Dr. Watson: drwtsn32

  • Manager vérirficateur drivers : check

  • Event Viewer : Eventvwr.msc

  • Verification of signatures of files: sigverif

  • Findfast (if present) : findfast.cpl

  • Folder Options : control folders

  • Fonts (fonts) : control fonts

  • Fonts folder windows : fonts

  • Free Cell ...: freecell

  • Game Controllers : Joy.cpl

  • Group Policy (XP Pro) : gpedit.msc

  • Hearts (card game) : mshearts

  • IExpress (file generator. Cab) : IExpress

  • Indexing Service (if not disabled) : ciadv.msc

  • Internet Properties : inetcpl.cpl

  • IPConfig (display configuration): ipconfig / all

  • IPConfig (displays the contents of the DNS cache): ipconfig / displaydns

  • IPConfig (erases the contents of the DNS cache): ipconfig / flushdns

  • IPConfig (IP configuration cancels maps): ipconfig / release

  • IPConfig (renew IP configuration maps) : ipconfig / renew

  • Java Control Panel (if present) : jpicpl32.cpl

  • Java Control Panel (if present) : javaws

  • Keyboard Properties: control keyboard

  • Local Security Settings : secpol.msc

  • Local Users and Groups: lusrmgr.msc

  • Logout: logoff

  • Microsoft Chat : winchat

  • Minesweeper (game): winmine

  • Properties of the mouse: control mouse

  • Properties of the mouse (2): main.cpl

  • Network Connections : control NetConnect

  • Network Connections (2): ncpa.cpl

  • Network configuration wizard: netsetup.cpl

  • Notepad : notepad

  • NView Desktop Manager (if installed): nvtuicpl.cpl

  • Manager links: packager

  • Data Source Administrator ODBC: odbccp32.cpl

  • Screen Keyboard: OSK

  • AC3 Filter (if installed) : ac3filter.cpl

  • Password manager (if present): Password.cpl

  • Monitor performance : perfmon.msc

  • Monitor performance (2): perfmon

  • Dialing Properties (phone): telephon.cpl

  • Power Options : powercfg.cpl

  • Printers and Faxes : control printers

  • Private Character Editor : eudcedit

  • Quicktime (if installed) : QuickTime.cpl

  • Regional and Language Options: intl.cpl

  • Editor of the registry : regedit

  • Remote desktop connection : mstsc

  • Removable Storage: ntmsmgr.msc

  • requests the operator to removable storage: ntmsoprq.msc

  • RSoP (traduction. ..) (XP Pro): rsop.msc

  • Scanners and Cameras : sticpl.cpl

  • Scheduled Tasks : control schedtasks

  • Security Center : wscui.cpl

  • Console management services: services.msc

  • shared folders : fsmgmt.msc

  • Turn off windows : shutdown

  • Sounds and Audio Devices : mmsys.cpl

  • Spider (card game): spider

  • Client Network Utility SQL server : cliconfg

  • System Configuration Editor : sysedit

  • System Configuration Utility : msconfig

  • System File Checker (SFC =) (Scan Now) : sfc / scannow

  • SFC (Scan next startup): sfc / scanonce

  • SFC (Scan each démarraget) : sfc / scanboot

  • SFC (back to default settings): sfc / revert

  • SFC (purge cache files): sfc / purgecache

  • SFC (define size CAHC x) : sfc / cachesize = x

  • System Properties : sysdm.cpl

  • Task Manager : taskmgr

  • Telnet client : telnet

  • User Accounts : nusrmgr.cpl

  • Utility Manager (Magnifier, etc) : utilman

  • Windows firewall (XP SP2) : firewall.cpl

  • Microsoft Magnifier: magnify

  • Windows Management Infrastructure: wmimgmt.msc

  • Protection of the accounts database: syskey

  • Windows update: wupdmgr

  • Introducing Windows XP (if not erased) : tourstart

  • Wordpad : write

  • Date and Time Properties : timedate.cpl

  • LinkWithin

    Related Posts Plugin for WordPress, Blogger...

    တြက္ခ်က္ပါ


    powered by calculator.net

    ေငြအတြက္မပူပါနဲ့

    ခ်က္ၾကမယ္ေလ


    Try Relay: the free SMS and picture text app for iPhone.